Wednesday, July 11, 2012

Frozen Paint

I love friends that share ideas they find! 
Frozen Paint was on such idea that my children just LOVED!
and SIMPLE!!!!

Washable kids paint
Ice cube tray
(plastic wrap or foil)
Craft sticks

that's it! well and some paper or cardboard of course :)

Put the paint into ice cube trays- one color in each section 
(I added water to the paint before putting it in the tray so it was not as thick and I didn't have to use so much- yeah I admit I am cheap like that haha)

Then I inserted the craft sticks. I left them sort of laying against the side and the kiddos really liked them  at this angle- but if you want them straight and centered, put foil or plastic wrap on the top of the tray and poke the sticks through so they stay standing up (hopefully)

Freeze!

Once the paint was frozen, I took them out of the freezer and loosened the cubes. Some were harder to get out so a ran the tray under warm water for a few seconds to loosen them more. once they were all loose, i ran them under a stream of water just to jump start the melting process.

To paint, you can use paper or cardboard (or anything similar- paper bags, wall paper_NOT ON THE ALLS OF COURSE! or whatever- the thicker the better though!)
We used cardboard that was coated white on one side, I believe I had them for cakes? They got mixed in with our craft stuff so I just grabbed them! PERFECT!!!


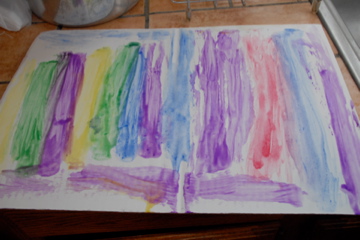
Let them rub the sticks on the paper/cardboard/whatever and as the cubes melt it makes beautiful colored trails :)

*sorry the pics are rotated- too lazy tonight to edit- but you get the idea anyway right? hahaha


Mew's finished painting- The Tank


 Jocie's finished painting- Rainbow Lines

My kiddos had a BLAST! and cannot wait to do this craft again!
I did see another idea where they used frozen paint mixed in shaving cream to make neat designs and art! That may be on our list of TO DOs soon!


Water Pad

Today we made what Jocie decided was the "Funnest craft ever"! She called it the "water pad"


I originally saw the idea Here and KNEW the kiddos would LOVE it!!!

Here is how we made ours.....

Plastic sheeting- chose the 3.5mil thickness- strongest one they had- in the paint section with the drop cloths and tarps
Duct Tape: They wanted something fun and decided on the cheetah print

Food Coloring- the more water you use the more food color you will need or it will get too diluted and not show well


I opened the plastic and rolled out about half of it and cut.
Then I spread it out on the floor and Jocie helped me fold it in half width-wise
Once it was flat, I folded the edges over trying to keep them as even as I could. -I tacked it in place with small pieces of tape to make it a bit easier to keep the ends lined up-
After I did one side I would fold the next side over and reinforce the edges with more duct tape.

*when we filled it later I realized I needed more on the corners or it would leak a bit, so make sure you really seal those corners and edges- although a small leak will not really matter too much as long as the water flows out slowly*

I left a small opening in the corner of one side (near where I had folded it in half)
Here is how it looked pre-water


Lay flat making sure there are no sticks or other sharp objects under it. Also the more level the area the better it will fill.
Insert a garden hose into the opening on the one end and begin filling. I added the food coloring as I was filling it with water.
Once you get it to the desired level, remove the hose, dry the plastic a bit and close the opening with duct tape just as you did the rest of the pad


The more water you add the less air you will see. The first time we filled it, I didn't put in enough water so when the kiddos would jump, the pad would sink to the ground- landing would have HURT- so we opened it back up (be careful- and not silly like me- open in a corner so it is easier to seal, not 6 inches from the corner where it will be hard to seal back up and cause leaking hahaha oooops! haha) 
IF you fill it until there is little air left in it, landing will be much softer and make it MUCH more fun!!!
When we added more water, it diluted the food coloring so the water was clear again (and the dry brown crispy grass was showing through, beautiful brown look ummm not really hahaha yuck! but they still LOVED it!- NEXT time MORE food Coloring! and they each get their own smaller pad so they won't jump on each other hahaha)

Another plus- If the water is cold, it is a great cooling pad if it is hot outside!

Enjoy! We sure did!!!


The water pad help up VERY well despite my rough little Mew! He kept trying to poke his fingers through the plastic and we had to patch a few places (DUCT TAPE oh yeah!!) but no major leaks or holes and they played on it twice today for an hour each time! awesome!!! it really was sturdy!